Cytron Technologies
Giờ làm việc: 8:00 - 17:00
Thứ 2 - Thứ 6 (trừ ngày lễ)
Hotline 0362917357

If you get an
from Cytron Technologies, it should come with a 32-bit Motherboard, from 1st December 2020 onwards.

No, you DON’T need to update the firmware of your 3D Printer. The stocked firmware (firmware that is pre-installed on the printer) out of the box will work fine for most of the task 🙂
Of course, when you want to try the latest firmware (example from Marlin), you can do it easily with a 32-bit motherboard. No extra programmer is needed. Just use a microSD card and some simple steps, you will get it updated. You may also need to update the firmware when you upgrade your 3D printer with ABL (Auto Bed Leveling) using CR-Touch, or BL-Touch. Or in some cases, the firmware is corrupted, for example blank LCD, you can actually try to update the firmware.
The 1st prerequisite is that your 3D Printer must come with a 32-bit motherboard. If you have a 8-bit board, this tutorial is not for you.
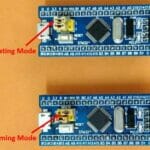
Even though your 3D printer might have a 32-bit controller board, you still need to find out the board version. So please open up the cover under the build bed and check the board version. Here are the two versions: V4.2.2 and V4.2.7.


You can use the microSD card that comes with the 3D Printer, but it must be formatted to FAT32 and only ONE firmware file is allowed to be in it for the upgrade process. So you have two choices:

Insert the microSD card into the USB MicroSD Reader/Writer, and to the laptop or computer’s USB port.

Make sure you have copy and backup information or files in the microSD card if that is necessary. Format the microSD card to
Click “Start” to proceed.

Now, the microSD card is ready to store the firmware bin file for your 3D Printer. Again, only 1 file and the filename must be unique everytime you want to update the firmware.
There are several choices for the firmware, but bear in mind that it must be .bin format. Source code with extension of “.c”, “.ino”, “.h”, etc is not a firmware bin file. What we need is compiled machine code.
Here are some sites that you can get the right firmware:
Note: The above firmware is pre-compiled and you just download the right firmware, maybe rename the file and upload to a 3D printer with a microSD card.
If you to customize and method to compile the firmware yourself, then check out: (these are not pre-compiled firmware, it is the source code)
Note: The above sites are the source code, you will need to configure the associated IDE, toolchains and edit the source code, finally compile it to generate the bin file.
With 32-bit controller board comes with bootloader that will read and load new firmware in microSD card:
Assuming you are getting the firmware from Cytron Github for Ender-3: CytronTechnologies/Ender-3_32-bit_Firmware (github.com)

So far, Cytron Technologies has only compiled the firmware for V4.2.2 mainboard for Ender-3. Please go into the “V4.2.2” folder and download the firmware file.

After download, you can move the firmware file into microSD that has been formatted into FAT32 system.

Now, you can change the file name to Date_version.bin

Do take note that only ONE file is in the microSD card. And to enable the built-in bootloader to load the new firmware, the firmware filename must be unique everytime. So in the case you need to upload several time to test different firmware, in the same day; you can simply change the version after the date. For example 19Aug21_b, or 19Aug21_c, and so forth.
Everything is ready, last step is to update your 3D Printer with the firmware in the microSD card.


Of course, you can always download the manufacturer’s firmware from Creality download page. However, so far, there is only stocked firmware, no new revision yet. The extra firmware are for 3D printer with additional features such as filament runout sensor, Auto Bed Leveling with BL Touch or CR Touch. Please DO NOT simply load those firmware with special feature if your 3D Printer does not have the sensor.
Anyway, please visit this page: Download | Creality 3D. Make sure you select the correct printer series, Ender Series Firmware —> Ender-3 3D Printer (Same firmware for BL-touch & CR-touch)

Now, based on your controller board version (V4.2.7 or V4.2.2), and the function needed, download the corresponding firmware zip file:
I have Ender-3 with V4.2.2 board and it is just basic with no filament runout sensor and ABL, so I downloaded the “Ender-3 4.2.2 mainboard (32bit).zip”

After you downloaded the firmware zipped file from the site, click the respective file and extract the zip file.

Go into the extracted folder, there are more folders. Choose “Marlin 2.0.1 V1.0.1 original version”, this is the default firmware that comes with the 3D printer for Ender 3 as of the time this tutorial is written.

There should be only 1 .bin file in the folder.

Copy that file to the MicroSD card that you have just formatted to FAT32. Rename the file so that it is unique.
Yup, you can again change the “version” to b, or c, or any number or alphabet, making the name unique.
And just follow the steps shared earlier, power recycle the 3D Printer with the microSD card in the 3D Printer SD slot.
Updating firmware to the new 32-bit controller board is much more easier than 8-bit board! So enjoy your 3D Printing with the new firmware.
Problem? Join Our Telegram Group and post your questions.